How to Create Build.gradle File for Upload to S3
Introduction
Hither we will meet how to create Microservices using Spring Boot and Bound Cloud and build using Gradle tool.
What are Microservices?
Before I tell yous about the microservices, I would like to tell you about monolithic architectural fashion, which is congenital every bit a single, democratic unit. And so let'due south say an spider web application with client-server model, where the server-side application is a monolith application that handles request/response, executes concern logic and piece of work with the data in the underlying database.
At present why microservices came into picture? what if you come across some change or some sort of migration? Whatsoever modification made to a small part of a monolithic application requires deploying entirely the new version. That's why, microservices came into picture.
Microservice, a.one thousand.a, microservice compages is an architectural manner with an approach for developing a single application as a suite of small services, each running in its own process and communicating with a lightweight resource API that has the following characteristics:
- Loosely coupled
- Highly maintainable
- Easily testable
- Independently deployable
- Built effectually business capabilities or unmarried responsibilities
- Mistake isolation
- Resilient
- Scalable
- Piece of cake to integrate with third party APIs
- Small and smart finish-point
Popular Microservices frameworks:
- Spring Boot (Best microservices framework in Coffee)
- Flask (Popular microservices framework in Python)
- Dropwizard (Java)
- Spark framework (Java)
- Swagger (Java)
- Jersey (Java)
- Seneca JS (Pop microservices framework in node.js)
Why Spring Boot is used in Microservices?
Microservices allow large systems to exist built upwardly from a number of collaborating components. It does at the process level what Spring has e'er done at the component level: loosely coupled processes instead of loosely coupled components and framework that has been evolved to be formidable for Coffee microservice evolution is Spring Kicking that has the following advantages:
- Spring Boot simplifies and bootstrapping application development.
- Spring Boot makes it piece of cake to develop production ready micro services.
- Spring Boot has a component called Bound Boot Actuator, which makes it easy to monitor applications.
Challenges with the Microservices architecture:
- Quick setup – you do non have a month to setup a microservice.
- Automation – needs automation in every activity, such as, build, deployment, monitoring etc. due to number of smaller components.
- Visibility – you demand a slap-up visibility around every component for monitoring and identifying problems automatically.
- Purlieus – understanding of the domain evolves over a period of time. Y'all need to ensure that the microservice boundaries evolve with time.
- Configuration – better to take configuration management when you demand to maintain configurations for hundreds of components beyond environments.
- Debugging – centralized logging is essential every bit you may need to investigate the problem into multiple services beyond different components.
- Scalability – advantage of microservices can exist realized if the application can scale upwards and down easily in the cloud.
Plenty talks! Now nosotros will move on to create microservices using Leap Boot two.one and Spring Deject and build using Gradle.
Prerequisites
Jump Boot 2.2.half-dozen, Java at least 1.8, Gradle 6.1.1, Eclipse
Example with Source Lawmaking
We assume that you already have at least Java 1.8 and Gradle vi.1.1 installed and configured appropriately.
In this tutorial we will create two microservices – Forex Service and Currency Conversion Service.
Forex Service – permit's say it provides currency exchange values for various currencies.
An example could be shown equally below:
Become http://localhost:9000/forex-exchange/from/USD/to/INR
{ "id": i, "from": "USD", "to": "INR", "rate": 71.0 } Currency Conversion Service – allow's say it provides total calculated corporeality from one currency to some other currency using Forex Service. So Currency Conversion Service is the consumer.
Every bit example could be written as beneath:
GET http://localhost:9100/currency-converter/from/USD/to/INR/quantity/100
{ "id": 1, "from": "USD", "to": "INR", "rate": 71.0, "quantity": 100, "totalAmount": 7100.0 } Microservice – Forex Service
Project Name
The project's name is forex-service that has been created in Eclipse IDE.
Build script
Create a Gradle project in Eclipse IDE and change the build.gradle script with the post-obit content:
buildscript { ext { springBootVersion = '2.2.6.RELEASE' } repositories { mavenLocal() mavenCentral() } dependencies { classpath("org.springframework.kick:jump-boot-gradle-plugin:${springBootVersion}") } } plugins { id "io.bound.dependency-management" version "ane.0.9.RELEASE" } use plugin: 'java' apply plugin: 'org.springframework.boot' sourceCompatibility = 12 targetCompatibility = 12 repositories { mavenLocal() mavenCentral() } dependencies { implementation("org.springframework.kick:spring-boot-starter-web:${springBootVersion}") implementation("org.springframework.boot:spring-kick-starter-data-jpa:${springBootVersion}") runtime("com.h2database:h2:1.four.200") } dependencyManagement { imports { mavenBom 'org.springframework.cloud:bound-cloud-dependencies:Hoxton.SR3' } } In the above build script we see that we take added Spring Boot.
We have added web starter, data jpa starter and H2 database dependencies.
We have included jump cloud version Hoxton.SR3.
You can also read Integrate H2 in-memory database with Spring Kick 2.1 and build using Gradle
Creating Entity class
package com.roytuts.forex.entity; import javax.persistence.Column; import javax.persistence.Entity; import javax.persistence.GeneratedValue; import javax.persistence.GenerationType; import javax.persistence.Id; @Entity public class ForexValue { @Id @GeneratedValue(strategy = GenerationType.IDENTITY) individual Integer id; @Column(name = "from_curr") private String from; @Column(name = "to_curr") private String to; individual Double rate; public ForexValue() { } public ForexValue(String from, String to, Double rate) { this.from = from; this.to = to; this.rate = rate; } //getters and setters } In the above class @Entity specifies that the grade is entity class. @Id specifies the principal key of the entity course.
We want the auto-increment values for the corresponding primary key into table column, and then we are using @GeneratedValue(strategy = GenerationType.IDENTITY).
Further we take not annotated all class attributes with @Column but only those columns which are dissimilar from course attribute proper name.
Creating Spring Data JPA Repository
parcel com.roytuts.forex.repository; import org.springframework.data.jpa.repository.JpaRepository; import com.roytuts.forex.entity.ForexValue; public interface ForexRepository extends JpaRepository<ForexValue, Integer> { ForexValue findByFromAndTo(Cord from, Cord to); } We extend the JpaRepository interface to get advantage of the Spring'southward built-in API.
Nosotros pass ForexValue every bit an entity and Integer to announce primary primal data type.
We find the conversion value from one currency to another currency using the method findByFromAndTo().
Creating the Spring Residuum Controller
Create below Spring Residuum controller to define a resources URI.
parcel com.roytuts.forex.residual.controller; import org.springframework.beans.factory.notation.Autowired; import org.springframework.http.HttpStatus; import org.springframework.http.ResponseEntity; import org.springframework.spider web.bind.notation.GetMapping; import org.springframework.web.bind.annotation.PathVariable; import org.springframework.spider web.demark.annotation.RestController; import com.roytuts.forex.entity.ForexValue; import com.roytuts.forex.repository.ForexRepository; @RestController public course ForexRestController { @Autowired individual ForexRepository forexRepository; @GetMapping("/forex-exchange/from/{from}/to/{to}") public ResponseEntity<ForexValue> getCurrencyExchange(@PathVariable String from, @PathVariable String to) { ForexValue forexValue = forexRepository.findByFromAndTo(from, to); return new ResponseEntity<ForexValue>(forexValue, HttpStatus.OK); } } We create the end-point as /forex-exchange/from/{from}/to/{to} for converting 1 currency to another currency value.
We query the database and detect the appropriate conversion rate from the table.
Creating main class
Create Spring Boot main class to deploy and start the application.
parcel com.roytuts.forex.primary; import org.springframework.boot.SpringApplication; import org.springframework.boot.autoconfigure.SpringBootApplication; import org.springframework.boot.autoconfigure.domain.EntityScan; import org.springframework.data.jpa.repository.config.EnableJpaRepositories; @EntityScan("com.roytuts.forex.entity") @EnableJpaRepositories("com.roytuts.forex.repository") @SpringBootApplication(scanBasePackages = "com.roytuts.forex") public class ForexApplication { public static void main(Cord[] args) { SpringApplication.run(ForexApplication.grade, args); } } We let the container know where our Repository interface and Entity course.
Creating application.yml
Create application.yml file nether src/main/resources to put some configurations:
jump: application: name: forex-service jpa: show-sql: truthful h2: console: enabled: true server: port: 9000 Nosotros enabled the H2 console and nosotros also want to see the database query in the console.
We desire embedded Tomcat server at port 9000.
Insert examination data into database
We want to exam our application, so we want to insert some test data into the database table.
Create sql script chosen data.sql nether src/main/resource with the following sql statements:
insert into forex_value(from_curr,to_curr,rate) values('USD','INR',71); insert into forex_value(from_curr,to_curr,rate) values('EUR','INR',85); insert into forex_value(from_curr,to_curr,rate) values('AUD','INR',39); Testing the Forex Microservice
Run the main class. When your main class successfully runs, you should find bulletin in the Eclipse console that your tabular array has been created:
Hibernate: drop table forex_value if exists Hibernate: create table forex_value (id integer generated by default equally identity, from_curr varchar(255), charge per unit double, to_curr varchar(255), principal key (id)) Your information.sql script gets executed also during application deployment.
You volition notice your embedded Tomcat started on port 9000:
Tomcat started on port(s): 9000 (http) with context path '' At present if you call Go request on http://localhost:9000/forex-commutation/from/USD/to/INR, and then you will see beneath output
{"id":i,"from":"USD","to":"INR","charge per unit":71.0} You volition find the database query got executed by looking at the log message into the Eclipse panel:
Hibernate: select forexvalue0_.id as id1_0_, forexvalue0_.from_curr as from_cur2_0_, forexvalue0_.rate as rate3_0_, forexvalue0_.to_curr as to_curr4_0_ from forex_value forexvalue0_ where forexvalue0_.from_curr=? and forexvalue0_.to_curr=? Microservice – Currency Conversion Service
Project Name
The project's name is currency-conversion-service that has been created in Eclipse IDE.
Build script
Create a Gradle based project in Eclipse and modify the build.gradle script to friction match the below content:
buildscript { ext { springBootVersion = '2.2.6.RELEASE' } repositories { mavenLocal() mavenCentral() } dependencies { classpath("org.springframework.kicking:bound-boot-gradle-plugin:${springBootVersion}") } } plugins { id "io.jump.dependency-management" version "1.0.ix.RELEASE" } employ plugin: 'coffee' utilise plugin: 'org.springframework.boot' sourceCompatibility = 12 targetCompatibility = 12 repositories { mavenLocal() mavenCentral() } dependencies { implementation("org.springframework.kicking:spring-kick-starter-web:${springBootVersion}") implementation("org.springframework.cloud:spring-cloud-starter-openfeign") } dependencyManagement { imports { mavenBom 'org.springframework.cloud:jump-cloud-dependencies:Hoxton.SR3' } } Creating a response bean
Create below bean for response that has to be sent to the clients or end users.
bundle com.roytuts.cc.model; public class CurrencyConversion { private Integer id; private String from; individual String to; individual Double rate; private Integer quantity; private Double totalAmount; public CurrencyConversion() { } public CurrencyConversion(Integer id, String from, Cord to, Double charge per unit, Integer quantity, Double totalAmount) { this.id = id; this.from = from; this.to = to; this.rate = rate; this.quantity = quantity; this.totalAmount = totalAmount; } //getters and setters } Creating a feign proxy
Nosotros can call Remainder service using RestTemplate but we have to write lots of code to brand a simple call. Therefore it is better to create a feign proxy to telephone call a Remainder service.
parcel com.roytuts.cc.proxy; import org.springframework.cloud.openfeign.FeignClient; import org.springframework.web.bind.notation.GetMapping; import org.springframework.web.bind.note.PathVariable; import com.roytuts.cc.model.CurrencyConversion; @FeignClient(name = "forex-service", url = "localhost:9000") public interface CurrencyConversionProxy { @GetMapping("forex-substitution/from/{from}/to/{to}") public CurrencyConversion retrieveExchangeValue(@PathVariable("from") String from, @PathVariable("to") String to); } In the above code, @FeignClient(name = "forex-service", url = "localhost:9000") tells that this is a Feign Customer and the url at which forex-service is present is localhost:9000.
@GetMapping("forex-commutation/from/{from}/to/{to}") indicates the URI of the service nosotros desire to eat.
Creating Spring Balance controller class
Create beneath Spring Remainder Controller form to consume the forex-service.
package com.roytuts.cc.rest.controller; import org.springframework.beans.factory.notation.Autowired; import org.springframework.http.HttpStatus; import org.springframework.http.ResponseEntity; import org.springframework.web.bind.annotation.GetMapping; import org.springframework.web.bind.annotation.PathVariable; import org.springframework.web.bind.annotation.RestController; import com.roytuts.cc.model.CurrencyConversion; import com.roytuts.cc.proxy.CurrencyConversionProxy; @RestController public grade CurrencyConversionRestController { @Autowired private CurrencyConversionProxy currencyConversionProxy; @GetMapping("currency-converter/from/{from}/to/{to}/quantity/{quantity}") public ResponseEntity<CurrencyConversion> getCurrencyExchange(@PathVariable String from, @PathVariable String to, @PathVariable Integer quantity) { CurrencyConversion response = currencyConversionProxy.retrieveExchangeValue(from, to); return new ResponseEntity<CurrencyConversion>(new CurrencyConversion(response.getId(), from, to, response.getRate(), quantity, quantity * response.getRate()), HttpStatus.OK); } } Making the phone call using the proxy is very simple. All we need to practise was to autowire the proxy and use to call the method.
Creating application.yml
Create below application.yml file nether src/main/resources to define some configurations, such as, application proper noun, server port etc.
spring: awarding: name: currency-conversion-service server: port: 9100 Creating main class
Create below main class to deploy the application into embedded Tomcat server and start the awarding.
package com.roytuts.cc.master; import org.springframework.boot.SpringApplication; import org.springframework.boot.autoconfigure.SpringBootApplication; import org.springframework.cloud.customer.discovery.EnableDiscoveryClient; import org.springframework.cloud.openfeign.EnableFeignClients; @EnableDiscoveryClient @EnableFeignClients("com.roytuts.cc.proxy") @SpringBootApplication(scanBasePackages = "com.roytuts.cc") public form CurrencyConversionApplication { public static void principal(String[] args) { SpringApplication.run(CurrencyConversionApplication.class, args); } } In the in a higher place class we take used @EnableFeignClients, because before we want to use feign customer we must enable it using the @EnableFeignClients annotation on the advisable package where the client proxy is defined.
Testing the application
Run the principal class. You volition meet the following message in the console when server gets started:
Tomcat started on port(southward): 9100 (http) with context path '' Once the application gets deployed into embedded Tomcat server then call the below URL in Remainder client or any other Residue utility tool to test the awarding.
Get http://localhost:9100/currency-converter/from/USD/to/INR/quantity/100
{"id":1,"from":"USD","to":"INR","rate":71.0,"quantity":100,"totalAmount":7100.0} Yous volition see following bulletin in the console of forex-service application.
Hibernate: select forexvalue0_.id as id1_0_, forexvalue0_.from_curr as from_cur2_0_, forexvalue0_.rate as rate3_0_, forexvalue0_.to_curr as to_curr4_0_ from forex_value forexvalue0_ where forexvalue0_.from_curr=? and forexvalue0_.to_curr=? In the above examples we have created 2 microservices and built communication between them. Withal we have hardcoded the forex-service REST URL into currency-conversion-service and it means when new case of forex-service is launched then we have no choice to distribute the client side load.
At present we will encounter how to utilise Ribbon API to distribute the client side load.
Therefore kickoff stop the currency-conversion-service if it is up already.
Add dependency for ribbon into build script of currency-conversion-service microservice. The entire dependencies in build.gradle script looks every bit below:
dependencies { implementation("org.springframework.boot:leap-boot-starter-web:${springBootVersion}") implementation("org.springframework.cloud:spring-cloud-starter-openfeign") implementation("org.springframework.cloud:jump-deject-starter-netflix-ribbon") } Build the currency-conversion-service and now enable RibbonClient in CurrencyConversionProxy interface as shown below:
package com.roytuts.cc.proxy; import org.springframework.deject.netflix.ribbon.RibbonClient; import org.springframework.deject.openfeign.FeignClient; import org.springframework.spider web.bind.annotation.GetMapping; import org.springframework.web.demark.note.PathVariable; import com.roytuts.cc.model.CurrencyConversion; @FeignClient(proper noun = "forex-service") @RibbonClient(name = "forex-service") public interface CurrencyConversionProxy { @GetMapping("forex-exchange/from/{from}/to/{to}") public CurrencyConversion retrieveExchangeValue(@PathVariable("from") String from, @PathVariable("to") String to); } As we desire to have multiple instances of forex-service, so nosotros have removed localhost:9000 from the @FeignClient.
At present let's say nosotros desire to run forex-service on two instances, so configure the instances in application.yml file nether src/main/resources of currency-conversion-service. The unabridged application.yml file looks as below:
spring: application: name: currency-conversion-service server: port: 9100 forex-service: ribbon: listOfServers: localhost:9000,localhost:9001 It's obvious from the above file that our forex-service will run on localhost:9000 and localhost:9001. So nosotros accept to configure forex-service to run on 9001 port because the forex-service already running on port 9000.
Beginning cease the forex-service if already running. Then configure forex-service to run on port 9001 port. To configure another launch program fro forex-service do the following:
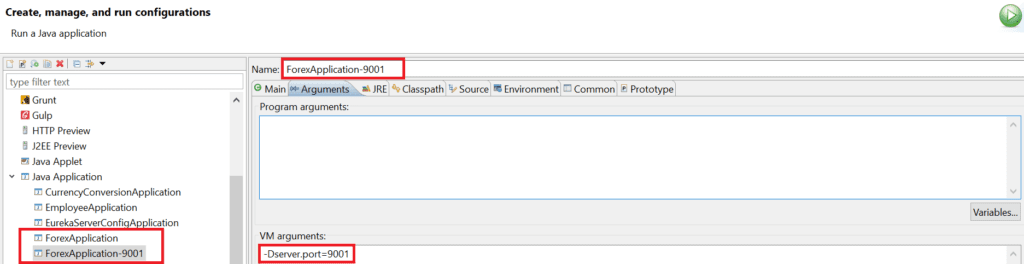
Do right click on the forex-service and select Run As -> Run Configurations…
When a popup window opens, nether the Java Application, search ForexApplication and do correct click on this and click on Duplicate.
Change the Name and put server port in VM arguments section under Arguments tab as shown in below image:
Now run two instances of forex-service and i example of currency-conversion-service by executing primary class.
And so forex-service instances are up on 9000 and 9001 ports, whereas currency-conversion-service instance is up on port 9100.
At present brand beneath requests:
Get http://localhost:9100/currency-converter/from/USD/to/INR/quantity/100
{"id":1,"from":"USD","to":"INR","charge per unit":71.0,"quantity":100,"totalAmount":7100.0} The above response come up from the example of forex-service running on port 9000. You will see the message on the Eclipse panel:
Hibernate: select forexvalue0_.id as id1_0_, forexvalue0_.from_curr every bit from_cur2_0_, forexvalue0_.charge per unit equally rate3_0_, forexvalue0_.to_curr as to_curr4_0_ from forex_value forexvalue0_ where forexvalue0_.from_curr=? and forexvalue0_.to_curr=? Become http://localhost:9100/currency-converter/from/USD/to/INR/quantity/1000
{"id":one,"from":"USD","to":"INR","rate":71.0,"quantity":1000,"totalAmount":71000.0} The higher up response comes from the instance of forex-service running on port 9001. You will see the bulletin on the Eclipse console:
Hibernate: select forexvalue0_.id as id1_0_, forexvalue0_.from_curr as from_cur2_0_, forexvalue0_.charge per unit every bit rate3_0_, forexvalue0_.to_curr as to_curr4_0_ from forex_value forexvalue0_ where forexvalue0_.from_curr=? and forexvalue0_.to_curr=? We are using Ribbon to distribute the load betwixt the ii instances of forex-service.
Still, nosotros are hard-coding the URLs of both instances of forex-service in currency-conversion-service. Therefore every time if there is a new instance of forex-service, nosotros need to change the configuration of currency-conversion-service and it's non what we want.
So we will use Eureka Naming Server to ready this problem.
Spring Kick project – eureka-server-config
At present we will create another Leap Boot project in Eclipse. And so create Gradle based project in Eclipse. The project'due south proper noun is eureka-server-config.
Build script
Modify the build.gradle script of eureka-server-config as show beneath:
buildscript { ext { springBootVersion = 'two.two.6.RELEASE' } repositories { mavenLocal() mavenCentral() } dependencies { classpath("org.springframework.boot:spring-boot-gradle-plugin:${springBootVersion}") } } plugins { id "io.leap.dependency-management" version "1.0.ix.RELEASE" } utilise plugin: 'java' apply plugin: 'org.springframework.kick' sourceCompatibility = 12 targetCompatibility = 12 repositories { mavenLocal() mavenCentral() } dependencies { implementation("org.springframework.deject:spring-cloud-starter-netflix-eureka-server") } dependencyManagement { imports { mavenBom 'org.springframework.cloud:bound-cloud-dependencies:Hoxton.SR3' } } In the above build script we take added eureka server.
Creating awarding.yml
Now add beneath content to src/main/resources/application.yml of eureka-server-config projection:
jump: application: name: eureka-server-config server: port: 8761 eureka: client: register-with-eureka: simulated fetch-registry: false Find we have added two backdrop with simulated value. If nosotros do not make them false (as past default they are true), you may face following exception while running Eureka server:
com.netflix.discovery.shared.transport.TransportException: Cannot execute request on whatever known server eureka.client.annals-with-eureka=false: if we make this property truthful then while the server starts the inbuilt client will try to register itself with the Eureka server.
eureka.client.fetch-registry=fake: if we make this holding truthful then the inbuilt client will try to fetch the Eureka registry, which is not yet available. Every bit a issue, we would get TransportException.
Creating main class
Create below principal course in society to deploy application into embedded eureka server on port 8761.
packet com.roytuts.esc.primary; import org.springframework.kicking.SpringApplication; import org.springframework.kick.autoconfigure.SpringBootApplication; import org.springframework.deject.netflix.eureka.server.EnableEurekaServer; @EnableEurekaServer @SpringBootApplication public grade EurekaServerConfigApplication { public static void primary(Cord[] args) { SpringApplication.run(EurekaServerConfigApplication.class, args); } } Now run the master class to deploy eureka-server-config awarding. Your eureka server starts on port 8761.
If you hit the URL http://localhost:8761 in the browser, you volition get below page.
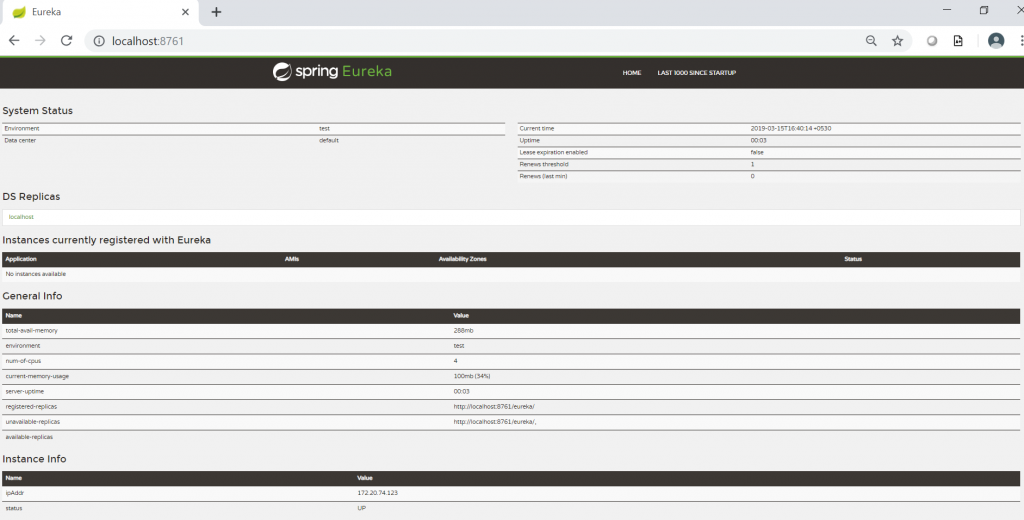
Currently at that place is no case running on eureka server.
Now we will connect forex-service and currency-conversion-service microservices using eureka server.
Now add together below dependency to both of the build scripts – forex-service and currency-conversion-service.
compile("org.springframework.cloud:leap-cloud-starter-netflix-eureka-client") Make sure you lot end the microservices earlier you lot add together to build script and later build the microservices.
Next we need to configure eureka URL into application.yml file of both microservices – forex-service and currency-conversion-service:
eureka: client: service-url: default-zone: http://localhost:8761/eureka Now remove the following configuration from src/principal/resource/application.yml file of currency-conversion-service:
forex-service: ribbon: listOfServers: localhost:9000,localhost:9001 At present change the ForexApplication primary form to add @EnableDiscoveryClient note. We demand this annotation to register with eureka server. The @EnableDiscoveryClient activates the Netflix Eureka DiscoveryClient implementation.
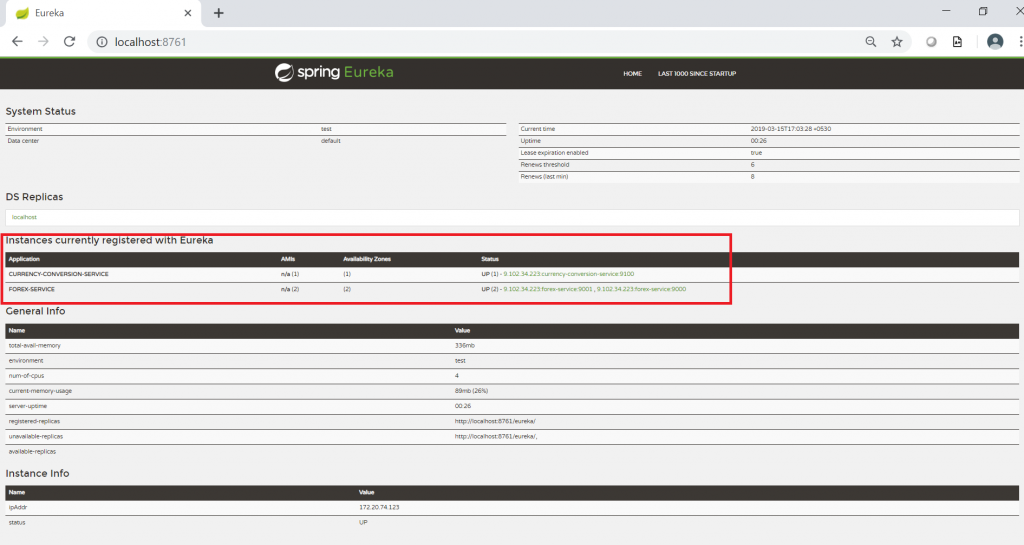
@EnableDiscoveryClient @EntityScan("com.roytuts.forex.entity") @EnableJpaRepositories("com.roytuts.forex.repository") @SpringBootApplication(scanBasePackages = "com.roytuts.forex") public class ForexApplication { Now run two instances of forex-service and i example of currency-conversion-service.
At present refresh the eureka server page URL – http://localhost:8761, you volition meet one instance of currency-conversion-service and two instances of forex-service are up as shown below in the epitome:
We accept at present created two microservices – forex-service & currency-conversion-service and established communication between them.
We are using Ribbon to distribute load between the two instances of forex-service and Eureka as the naming server.
When we launch new instances of forex-service, you would encounter that load is automatically distribute to them.
Now you lot tin continue the aforementioned tests y'all performed before we created eureka-server-config application.
That'due south all on how to create microservices using Leap Boot and Jump Deject and build using Gradle tool.
Source Code
download source code
Thanks for reading.
Source: https://roytuts.com/create-microservices-using-spring-boot-and-spring-cloud-and-build-using-gradle/
0 Response to "How to Create Build.gradle File for Upload to S3"
Postar um comentário